12
Jul
10 Minute Read
While I love to ride in the area where I live, specifically the mid-peninsula of the San Francisco Bay Area, there are plenty of great opportunities to ride elsewhere. Loading up my bike, often along with my girlfriend’s bike since she rides with me a lot, is a relatively easy thing to do once you do it a few times.
Typically this is dictated mostly by the kind of car you drive, but there are a few primary options that people use for transporting their bikes somewhere.
These days, because the car(s) I use for transporting my bike can do it comfortably, I like to carry the bike(s) inside the car. I especially prefer doing this for longer trips. Some key points about this option:
This option unfortunately is very much dictated by the type of car you may already have, and for most people, deciding to carry bikes inside your car is not necessarily a primary reason for purchasing a car.
If you do have a sedan, and want to put a bike (or possibly two) inside the vehicle, check to see if the rear seats fold down as a pass through option. I used to own a BMW and I found that the passthrough option would let me carry my one bike with my stuff pretty well, all things considered.

I actually once managed to squeeze in two bikes into a 5-series BMW, but I wouldn’t say it’s easy and I certainly wouldn’t recommend it for long distance transportation! It required me to remove both wheels on the second bike and place some padding between the two bikes, as there were several parts that were laying on top of each other.
I love the look of a good roof rack. Especially on GTI’s and other hatchback style cars. Most cars can actually have a roof rack mounted, even the nicer ones, despite what you may think. Going with a manufacturer’s specific style is going to be the best fit overall, but also likely the most expensive option.
It’s actually the preferred option of transporting spare bikes around for the pros during official events, like in the Tour de France.

I actually took this photo myself while watching the Tour go by on the Col du Galibier on Stage 18 of the Tour de France in 2019. I’ll have to make a separate post just for that day…
While I do not have own one of these bike racks, I did look into them at one point and I found a few pros and several cons (at least in my opinion):

I used to own one of these, actually, mounted on my Acura TL that I had at the time. It was quite handy, and is my second-preferred option behind storing my bike inside my car.

Some points about this style of transporting your bike:
I eventually sold this rack, which was an Inno branded rack, despite really liking it. This was primarily because I moved and I didn’t have anywhere to store the rack when I didn’t want it on the back of my bumper. At the time, I simply wasn’t driving my bike to enough places (yet) to justify keeping it around. Someone on Craigslist got a great deal!
Oh! And these racks usually come in one of two styles - one where you hang your bike on an arm of some kind, and the other where you can put your bike wheels into a ski of some kind and clamp arms around on the wheels. I prefer the second variety, as it’s not a great idea to hang carbon bike frames like this over extended periods of time.
Despite this post being mostly about the bike racks themselves, I want to share a bit more about what i’ve learned when it comes to packing bikes into these various arrangements.
Note that most of this will likely be skewed towards the perspective of transporting bikes inside the car, as I think that’s where things are more tricky than the other options.
This is a given in most cases. Unless, of course, you have a fancy hitch-mounted track that you can simply drop your bike into.
If you have rim mounted brakes, you are likely using traditional quick-release skewers. They’re easy to get on and off, and have been the standard arrangement for bike wheels for decades.

It works like a screw mechanism, with a handle end that clamps down at a perpendicular angle to cinch everything together. You also open up the brake caliper to get more room around the caliper and your tire, and then you simply lift your wheel out of the frame. Easy Peasy.
By now, a lot of people are riding bikes with disc brakes. They’re quite effective in my experience (another topic to debate these days, of course), but the additional complexity of managing them can be tricky for newcomers.

Some have a quick-release-like mechanism that requires using the handle to find a groove to use to unscrew the axle from the other side of the frame, and some don’t have a handle at all, relying on a hex wrench to remove the axle from the frame. There are claimed weight savings there, and a certain aesthetic that’s nice, but it certainly is more to manage. It’s how my bike is and I just deal with it these days, since I don’t feel like it takes me very long whenever I need to remove the front wheel.
I actually like to bring a small bag that I got from REI that carries my mechanical-related tools with me. I specifically use a Silca Star Tool because it’s easy to use, and can still provide some good torque.
These little guys are cheap, and sometimes you can get them for free if you ask a bike shop mechanic at a big box store who gets a bunch of bikes at once.

It basically mimics having a disc brake rotor inside the caliper when there isn’t one physically in there. This is especially important if you have hydraulic disc brakes, because if you grab the brake levers while there is no rotor inside the caliper, you will have to manually press back the calipers and could potentially introduce bubbles into your hydraulic line (which requires you to bleed the system and refill it).
If you’re thoroughly confused by all of that, check out this great GCN video for a more detailed explanation of what I mean.
When going on a longer trip, like my girlfriend and I just recently did down to San Diego, I find that you want to put the bikes in the car first. If you’re putting your bikes into a bike rack, then they actually will be packed in last, especially since some of them do not allow you to open your trunk or back hatch when in place.
I use these to pack things fairly tightly when needed, and most particularly, protect the bikes from rubbing against all the other things you’re carrying inside the car. They can also protect delicate plastic materials inside your car.
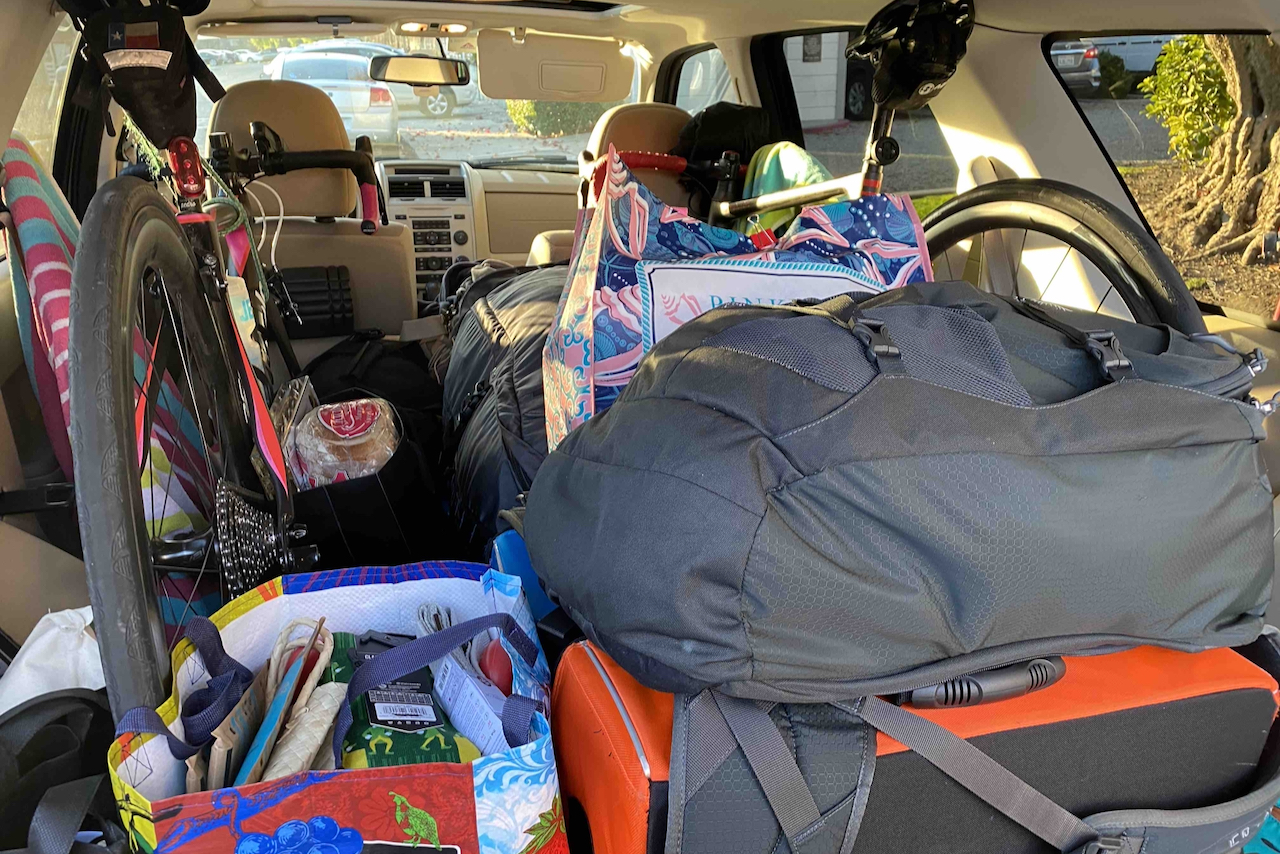
I like to put the bikes upright in the car, on either side of the car. I can get away with this one because the seat height for me isn’t very tall, nor is my girlfriend’s. Otherwise, we’d also have to remove the seatpost to pull this one off.
In my girlfriend’s Ford Escape, we can use bungie cords to hold the frame in place from side-to-side motions (careful not to make these too tight, or you can wear off the finish of your frame!). You can hook the cords into the coat hanger / hooks or even seatbelt locking mechanisms that most cars have.
Make sure to put the front fork of your bike(s) on a towel to prevent grease and damage to your car.
We also grab a towel to wrap around the front wheel (turning it into a towel disc) and typically place it in the gap created between the car door and the inside of the handlebar. It may rock a bit back and forth in transit, but with the towel, we don’t usually have issue there.
Since we have a large gap between the bikes at this point, I like to use our stuff to fill the space between them. As long as they don’t move around and rock much, you shouldn’t have issues with them falling into the bike frames. Just visualize and anticipate movement that you know your car will have, and imagine how things will change over time.
I also try to keep things like backpacks with electronics and jackets / sweaters that you may need intermittent access to either at the back near the hatch or at the front, so that the passenger can grab things while driving.
All of this roughly translates into a final product like so:

Yeah. Just don’t. All your stuff is in there!
Oh, and if you’ve put your bikes on the outside of your car, be aware of garages, low hanging trees, and if you have a hitch-mounted rack, dips in the road that can scrape up the bottom of it.
All of this may sound like a lot of work, especially at first, but be patient. I promise that the pay off is worth it.
Exploring the world by bicycle is now one of my favorite things to do. Whenever I go somewhere new, I’m always on the lookout for new routes, new things to do, and imagining myself exploring hills, mountains, fields, everything, from the back of two wheels under my own power.
Plus, riding a lot while on vacation is not only fun, but you usually burn enough calories doing so that you can really enjoy the food on your vacation! Fish tacos in San Diego are always a good choice.


